Windows OS
Windows 11 Configurations
- Install Microsoft Store
wsreset -i - Use UTC
reg add "HKLM\SYSTEM\CurrentControlSet\Control\TimeZoneInformation" /v RealTimeIsUniversal /t REG_DWORD /d 1 /f - Disable Fast Boot (Which benefit is not very sensible on SSD)
reg add "HKLM\SYSTEM\CurrentControlSet\Control\Session Manager\Power" /v HiberbootEnabled /t REG_DWORD /d 0 / - Disable WFP logging for Port Scanning Prevention Filter, which generate senseless writes for SSD
netsh wfp set options netevents=off - Disable Telemetry. In Group policy:
Administrative Templates
 -> Windows Components
  -> Data Collection and Preview Builds
   -> Allow Telemetry -> Enabled, Options: 0 - Security [Enterprise Only]
Disable Connected User Experiences and Telemetry ServiceTask Scheduler Library -> Microsoft -> Windows -> Application Experience -> Microsoft Compatibility Appraiser -> DisableSet-Service DiagTrack -StartupType Disabled - Disable CPU Spectre, Meltdown, ZombieLoad Patch
Microsoft Docsreg add "HKEY_LOCAL_MACHINE\SYSTEM\CurrentControlSet\Control\Session Manager\Memory Management" /v FeatureSettingsOverride /t REG_DWORD /d 3 /f reg add "HKEY_LOCAL_MACHINE\SYSTEM\CurrentControlSet\Control\Session Manager\Memory Management" /v FeatureSettingsOverrideMask /t REG_DWORD /d 3 /f - Show seconds in taskbar
reg add "HKEY_CURRENT_USER\Software\Microsoft\Windows\CurrentVersion\Explorer\Advanced" /v ShowSecondsInSystemClock /t REG_DWORD /d 1 /f Windows 11 full right-click menu
- Enable:
reg add "HKCU\Software\Classes\CLSID\{86ca1aa0-34aa-4e8b-a509-50c905bae2a2}\InprocServer32" /f /ve Disable:
reg delete "HKCU\Software\Classes\CLSID\{86ca1aa0-34aa-4e8b-a509-50c905bae2a2}" /fDon't forget to reboot.
- Enable:
System Administration and Troubleshooting Guide
Checking Processes Using the Webcam
To identify which processes are accessing your webcam, use Process Explorer from Microsoft Sysinternals.
Steps
- Download Process Explorer
- Obtain Process Explorer
- Extract the files and run
procexp64.exewith administrator privileges.
- Locate the Webcam's Physical Device Object Name
- Open Device Manager (
devngnt,nsc). - Find your webcam under "Imaging devices" or "Cameras".
- Right-click the webcam, select Properties > Details tab, and choose Physical Device Object name from the dropdown.
- Copy the displayed value (e.g.,
\Device\000000XX).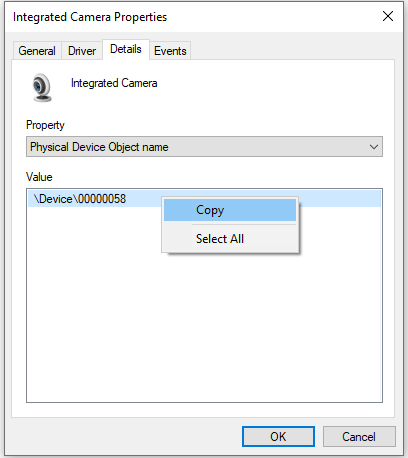
- Open Device Manager (
- Search for Processes in Process Explorer
- Open Process Explorer with administrator rights.
- Press
<C-f>, and paste the webcam's physical device object name, to search in handles. - Review the results to identify processes using the webcam (e.g., an emulator like MuMu with its camera app open).
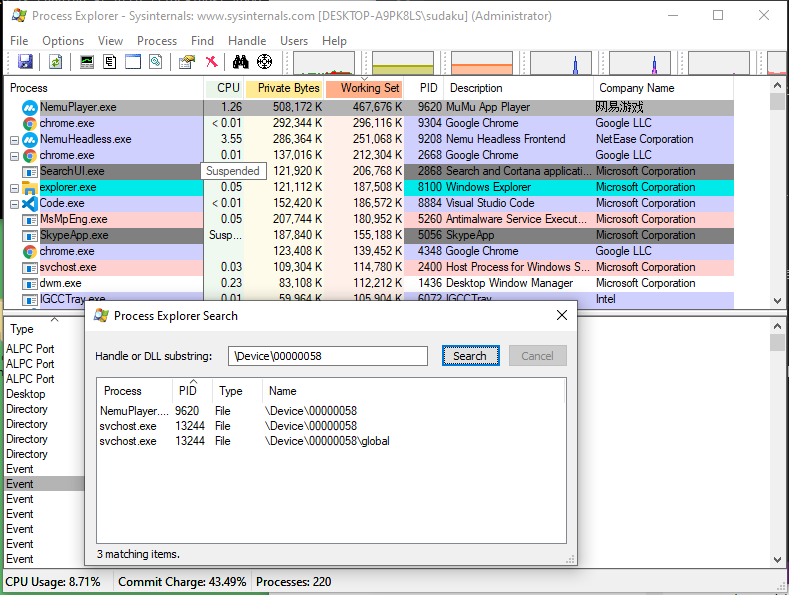
Notes:
- If only
svchost.exeappears in the results, a Universal Windows Platform (UWP) app is likely using the webcam.- This method can also be used to check other devices, such as microphones, by finding their physical device object names.
Enabling Compact Compression for System Files
Compact compression reduces the disk space used by Windows system files.
Run these in an elevated PowerShell or Command Prompt:
- Enable Compression:
Compresses all system files to save disk space.compact /compactos:always - Check Compression Status:
Displays whether compact compression is enabled.compact /compactos:query - Disable Compression:
compact /compactos:never
Compression may slightly impact performance but significantly reduces disk usage.
Cleaning the Component Store (WinSxS)
The WinSxS folder stores Windows component files and can grow large over time. Use the Deployment Image Servicing and Management (DISM) tool to analyze and clean it.
Run these in an elevated PowerShell or Command Prompt:
- Analyze Component Store Size:
Reports the size of the WinSxS and recommends cleanup if necessary.dism.exe /Online /Cleanup-Image /AnalyzeComponentStore - Clean Component Store:
Removes superseded and unused components from WinSxSdism.exe /online /Cleanup-Image /StartComponentCleanup
Cleaning WinSxS is safe but irreversible; ensure you don’t need older component versions before proceeding.
Managing Intel Management Engine (ME) Firmware
The Intel Management Engine (ME) is a subsystem in Intel chipsets. Use Intel's tools to view, back up, or update ME firmware.
Tools Required
MEInfoWin.exe: Displays ME firmware information.FWUpdLcl64.exe: Backs up or updates ME firmware.
Download these from Intel’s official website or your motherboard manufacturer.
Steps
- View ME Information:
MEInfoWin.exe - Back Up ME Firmware:
FWUpdLcl64.exe -SAVE backup.bin - Update ME Firmware:
FWUpdLcl64.exe -f ..\ME8_1.5M_Production.bin
Troubleshooting Hyper-V Manager
Hyper-V Manager may require remote management configuration using Windows Remote Management (WinRM). Follow these steps to enable and configure WinRM on both the client and host machines.
Steps
- Enable WinRM on Client and Host
This configures WinRM to receive requests and starts the service.Enable-PSRemoting -Force- If you encounter a firewall error (e.g., network set Public), set the network connection to Private:
Note theGet-NetConnectionProfileInterfaceIndexof each network (e.g.,9or16).Set-NetConnectionProfile -InterfaceIndex <Index> -NetworkCategory PrivateIf error persist, by pass the network profile check:
Enable-PSRemoting -SkipNetworkProfileCheck -Force
- If you encounter a firewall error (e.g., network set Public), set the network connection to Private:
- Configure Trusted Hosts on the Client
- Add the host machine to the client’s trusted hosts list:
Set-Item WSMan:\localhost\Client\TrustedHosts -value "DESKTOP-XXXXXXX.lan" -Force - Verify the trusted hosts:
Get-Item WSMan:\localhost\Client\TrustedHosts - To add multiple hosts, append to the existing list:
$cur_val = (Get-Item WSMan:\localhost\Client\TrustedHosts).value
Set-Item WSMan:\localhost\Client\TrustedHosts -Value "$cur_val,server01.tailba6c3f.ts.net"
- Add the host machine to the client’s trusted hosts list:
Notes:
- Use
-Forceto avoid prompts, but verify settings afterward.- Trusted hosts can include wildcards (e.g.,
*.domain.com) for broader access.